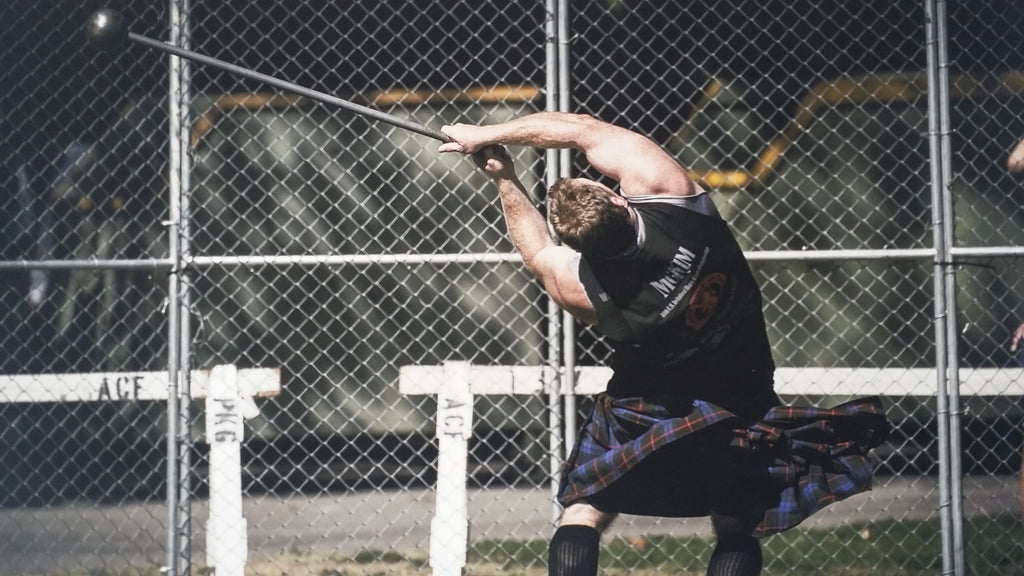
The Betz Slam Drill. I named it this because that’s who taught it to me – Sean Betz. For those of you who didn’t get the opportunity to throw with Sean, or even watch him throw, you missed out on one of the truly great American throwers in history. I could regale of stories about Sean and his throwing prowess, but that’s for another day. Today, we address the hammer drill he showed me years ago.
So, when you’re throwing the light or heavy hammer, it’s hard to warm up. At a competition, you’re not allowed to throw the hammer like you do the other events to warm up (just think how dangerous that could be). To warm up, you dig your blades in and start taking winds. Sean showed me how he would “slam” the hammer into the ground over his right side instead of doing the alternative that many throwers do: slowing the winds down after three or even jumping up and pulling their blades out of the ground (this one takes some athleticism I just don’t have).
As I messed around with this drill more, I realized it became a staple for not only my warm up, but for me in my timing and execution of the hammer throw. My focus of keeping the low point of the ball’s orbit over the right foot was taught and influenced to me by Sean, who noticed it first from Matt Sandford (five-time World Champion). The drill, really, is quite simple. Let’s break it down:
- Dig into the ground with your hammer blades (remember, that hammer stance should be shoulder width or slightly closer). Set yourself up in an open area, especially to the direct right of you. Also, when it comes to warm up, I always use the light hammer first. Even on days that I'm going to throw the heavy hammer, I warm up with the light. Hit those positions and feel that speed; then jump in wiht the heavy hammer.
- Wind the hammer up to three times and then throw (slam) the hammer into the ground out over your right foot.
- As you slam, you’ll want to be leaning back towards the throwing area, and even take a half step that direction as you throw it (this should largely mimic your actual throw).
Now, remember a few things as you wind and throw the hammer on this drill. First, “catch” the hammer back over your right shoulder as early as you can. The ball will naturally drift left (right handed throwers), so keep that low point as far right as you can. With each wind, make sure you are “catching” the hammer early over your right shoulder and driving it down over your right foot (I like to think of chopping wood). Secondly, as you are about to throw it into the ground, realize it is just that – a throw into the ground. You aren’t letting it go, you’re throwing it down. Focus on making the biggest crater you possibly can. This teaches your body to have a more effective and powerful push on the ball.
Use the hammer landing zone as a check of sorts. You want to be so consistent that each throw is landing in the same crater; the more times you can that, the better you’ll be able to catch, push and launch the hammer. All of this adds up to more speed, which means more distance … awesome! You’ll also want to use this zone as a measure of how far off you are on the low point. If the crater is out in front of you instead of more to the side, then you need to work that low point back over to the right.
The Betz Slam Drill is, in my opinion, the best thing you can do to work consistency and timing in your throws; do it!
moon coffs
We are the best and Unique producer of HIGH QUALITY Undetectable counterfeit Banknotes. With over a billion of our products
circulating around the world. We offer only original high-quality counterfeit currency NOTES. We ship worldwide. We too
Contact details
Website: https://www.globcoffs.com/
Telegram@Nicecoff179373
WhatsApp +1 720 334 7285
We use latest technology to produce our notes so that it looks 100% identical to the real note. This thus implies everything
security features present in the real notes are present in the note we make. Our team is made up of Quality IT technicians
from Morocco, US, Europe, Korea and China etc We offer high quality counterfeit NOTES for all currencies.
Why would you buy from us?
Our banknotes contain the following security features that make
it to be genius and we have the best grade counterfeit in the world both Euro and Dollar and any bills of your choice you
because.
Security features of our bank notes below:
Intaglio printing
Watermarks
Security thread
See-through registry
Special foil/special foil elements
Iridescent stripe / shifting colors.
Our banknotes are printed on 80% cotton 20% cellulose paper which differs substantially from normal paper. By using a special
printing technique, several picture elements on the front of the banknote are identifiable by touch. The guidelines on
detecting counterfeit currency give a comparison of genuine and falsified security features.
Hi
Can be used in banks but can be used else where same like normal money
We have the best HOLOGRAMS AND DUPLICATING MACHINES
UV: YES
EUR – Euro
USD – US Dollar
GBP – British Pound
AUD – Australian Dollar
CAD – Canadian Dollar
AED – Emirati Dirham
CHF – Swiss Franc
CNY – Chinese Yuan Renminbi
MYR – Malaysian Ringgit
NZD – New Zealand Dollar
Contact details
Email: info@globcoffs.com
With over a billion of our products circulating around the world. We offer only original high-quality counterfeit currency
NOTES. We ship worldwide. We also print and sell Grade A banknotes of over 52 currencies in the world. Here’s your chance to
be a millionaire. Our money is perfectly reproduced, Indistinguishable to the eye and to the touch. We are sending in various
sizes, packed and hidden. All our notes carries all the holograms and water marks and passes the light detector test. We will
deliver the money directly to your home without the interference of customs. we have a Huge quantity ready in stock.
EUROS,DOLLARS AND POUNDS AND NOVELTY DOCUMENTS DRIVERS LICENSE.
Contact us for more information using the information below:
These features make our bills to be 100% undetected,100% safe and secure to use in any of these areas: BANKS, CASINO, ATM,
MONEY CHANGERS, STORES. They are 100% Undetected.
Build trust in yourself when contacting me and don’t tell me about your past experience when you were ripped off. I believe
that any body who has even been ripped or because of counterfeit money buying went in for small amounts. Shipping is from the
USA Within the US is 24 hours and
outside using is 3 days. We give you tracking number.
-My Minimum order is 5000 counterfeit for 300 – Shipping is free
-Face to face Cash on Delivery will be scheduled. Some people want me to send my agents to them so that they can buy
directly but for me to send out my agents. There must be a minimum order you want to buy. 500,000 counterfeit notes for
200,000 when it comes to face to
face buying.
Email me with your location and the currency you need.
Contact details
Website: https://www.globcoffs.com/
Telegram @Nicecoff179373
WhatsApp +1 720 334 7285
united-states-dollars 20
canadian-dollars 12
australian-dollars 7
euros 20 50
cindy xan
BUY EUTYLONE,PEPTIDES,APVP,MDPV,MXE,4 MEC AND OTHER RESEARCH CHEMICALS..session ID:0531a350c4975c30ed2231e3bcea1f31a5d6ea3242a7d8274044747b32fd9d443f
Eutylone Suppliers is a top research chemical vendor with many years of supply experience. Eutylone Suppliers offers for sale a large number of research chemicals for students, researchers, and hobbyists and ships direct from the USA to AU, EU, UK, and most of the rest regions of the world. Recognizing the difficulty of researchers to get supplies of fine chemicals direct from the USA, we decided to create this website with the aim to provide the USA and the rest of the world with fine research chemicals of almost any kind.
Visit our website at https://eutylonesuppliers.com
email…eutylonesuppliers@gmail.com
https://eutylonesuppliers.com/product-category/nembutal-pentobarbital/
https://eutylonesuppliers.com/product-category/analgesic-drugs/
https://eutylonesuppliers.com/product-category/benzodiazepine/
https://eutylonesuppliers.com/product-category/cannabinoids/
https://eutylonesuppliers.com/product-category/cathinone/
https://eutylonesuppliers.com/product-category/compound/
https://eutylonesuppliers.com/product-category/eutylone/
https://eutylonesuppliers.com/product-category/featured/
https://eutylonesuppliers.com/product-category/liquid-chemicals/
https://eutylonesuppliers.com/product-category/opiods/
https://eutylonesuppliers.com/product-category/organic-compounds/
https://eutylonesuppliers.com/product-category/peptides/
https://eutylonesuppliers.com/product-category/pharmaceuticals/
https://eutylonesuppliers.com/product-category/psychedelics/
https://eutylonesuppliers.com/product-category/psychopharmaceutical/
https://eutylonesuppliers.com/product-category/reserch-chemicals/
https://eutylonesuppliers.com/product-category/stimulants/
https://eutylonesuppliers.com/product-category/triazolobenzodiazepine/
https://eutylonesuppliers.com/product-category/nembutal-pentobarbital/
email…eutylonesuppliers@gmail.com
Session ID….0531a350c4975c30ed2231e3bcea1f31a5d6ea3242a7d8274044747b32fd9d443f
signal…eutylonesuppliers.69
whatapps +255743539711
vincent luna
Buy high quality undetectable grade AA+ counterfeit banknotes,
we have available USD, CAD, GBP, EU AUD just to name a few,
We also deal and specialize in helping you to get high quality Biometric documents,
registered PASSPORT, DRIVING LICENSE, ID CARD, VISA, SSN TOEFL, IELTS, IDP, ESOL,
GMAT CELTA/DELTA, DEGREE,DIPLOMAS & other English Language Certificates[ Whats App:+16614123859]
Buy fake usd/aud/cad/CNY/euros/RMB (WHATSAPP: +16614123859)
Buy fake USD $,https://procurrencyland.com/buy-fake-us-dollars-usd-online/
Buy Fake Canadian Dollars ( CAD ),https://procurrencyland.com/buy-fake-canadian-dollars-cad-online/
Buy counterfeit USD ,https://procurrencyland.com/buy-fake-us-dollars-usd-online/
Order fake USD , https://procurrencyland.com/buy-fake-us-dollars-usd-online/
Buy US Dollar Bills https://procurrencyland.com/buy-fake-us-dollars-usd-online/,
Buy Prop Money , https://procurrencyland.com/
Buy Fake Euros , ,https://procurrencyland.com/buy-fake-euros-online/
Buy fake Australian dollars , https://procurrencyland.com/buy-fake-australian-dollars-aud/
Buy Fake Money , https://procurrencyland.com/
Buy Counterfeit Money, https://procurrencyland.com/
Buy fake US dollars https://procurrencyland.com/buy-fake-us-dollars-usd-online/
Buy fake GBP banknotes https://procurrencyland.com/buy-fake-british-pound-gbp/
Buy fake counterfeit us bills,https://procurrencyland.com/
buy fake Canadian dollars (CAD) https://procurrencyland.com/buy-fake-canadian-dollars-cad-online/
Buy 100% undetected counterfeit money,https://procurrencyland.com/
Buy clone cards, https://procurrencyland.com/?s=cloned+cards
Buy fake Chinese yuan, https://procurrencyland.com/buy-fake-chinese-yuan-cny-renminbi/
Buy fake euros,https://procurrencyland.com/buy-fake-euros-online/
Buy fake canadian dollars in Ontario, https://procurrencyland.com/buy-fake-canadian-dollars-cad-online/
Buy fake canadian dollars in Winnipeg, https://procurrencyland.com/buy-fake-canadian-dollars-cad-online/
Buy fake canadian dollars in Toronto,https://procurrencyland.com/buy-fake-canadian-dollars-cad-online/
Buy 100% Undetectable Counterfeit, https://procurrencyland.com/buy-fake-canadian-dollars-cad-online/
Buy fake counterfeit us bills,https://procurrencyland.com/
Buy fake usd/aud/cad/JPY/CNY/GBP/euros/pounds/dollars, https://procurrencyland.com/
Buy Fake Canadian Dollars. https://procurrencyland.com/buy-fake-canadian-dollars-cad-online/
Why using a special printing technique, several picture elements on the front of the banknote are identifiable by touch.
The guidelines on detecting counterfeit currency give a comparison of genuine and falsified security features.
– Our bills/notes bypass everything, counterfeit pens and machines.
– Can be used in banks but can be used else where same like normal money
– We have the best HOLOGRAMS AND DUPLICATING MACHINES-
– UV: YES
Our bills have the Infrared Detection which makes our bills to bypass the UV machines,
Pen test and even eye detection buy counterfeit experts.
Our notes are AAA+ grade Quality.
We also sell and provide money cleaning services and solutions.
We sell AAA+ SSD Black Money Solution.
-Holograms and Holographic Strips
-Micro-Lettering
-Metallic Ink and Thread
-Watermarks
-IR Detection
-Ultra-violet features
-See through Features
-Different serial numbers
These features make our bills to be 100% undetected,100% safe and secure to use in any of these areas:
BANKS, CASINO, ATM, MONEY CHANGERS, STORES. They are 100% Undetected
!!!!!!!!!! Basic Contact Information Bellow !!!!!!!!!!
Phone Number Call/Text:……….(+16614123859)
Whats-App Number:…………(+16614123859)
Website…https://prodocsandbills.com
Website…https://procurrencyland.com
Email.specialdocuments350@gmail.com
Telegram:@Authenticpaper
Snapchat….deepweb90
Buy driver’s license( [ Whats App: +16614123859 ]) ID card, passports, Biometric documents online.
BUY real British passports (UK), Americans, Canadianshttps://prodocsandbills.com/product-category/buy-real-passport-online/
False identity CARDS ONLINE IN UNITED STATES, DRIVING LICENSEhttps://prodocsandbills.com/product-category/buy-fake-id-card-online/
Buy IELT/PTE Certificate https://prodocsandbills.com/product-category/buy-ielts-pte/
BUY FAKE DRIVING https://prodocsandbills.com/product-category/buy-drivers-license/
Buy Real USA Green Card and Citizenship.https://prodocsandbills.com/
Buy Visa, passport, id card, birth certificate, Driving License Transcripts
Buy Original FAKE Passports ,Id Card Drivers License https://prodocsandbills.com/
Best Quality Novelty real and Fake IDs and Passports,Marriage certificates and Drivers license etc buy now high quality-
We have the best HOLOGRAMS AND DUPLICATING MACHINES With over 13million of out documents circulating over the world.
Buy High Quality Real Express UK/USA Passport//ID Cards//Counterfeit Banknotes//IELTS//TOEFL [ Whats App: +16614123859 ]
We are looking forward to receiving your inquiries and early receipt of your first orders!!!!!!!!!!!!!!! NO TIME WASTERS !
vincent luna
购买高质量、不可检测的AA+级伪钞。
我们提供美元、加元、英镑、欧元澳元等多种货币。
我们还专门为您提供高质量的生物识别文件,
注册护照、驾照、身份证、VISA卡、社会安全号码、托福、雅思、IDP、ESOL、
GMAT、CELTA/DELTA、学位、文凭和其他英语语言证书[Whats App: +16614123859]
购买假美元/澳元/加元/人民币/欧元/人民币 (WhatsApp: +16614123859)
购买假美元,https://procurrencyland.com/buy-fake-us-dollars-usd-online/
购买假加元 (CAD), https://procurrencyland.com/buy-fake-canadian-dollars-cad-online/
购买假美元,https://procurrencyland.com/buy-fake-us-dollars-usd-online/
订购假美元,https://procurrencyland.com/buy-fake-us-dollars-usd-online/
购买美元纸币,https://procurrencyland.com/buy-fake-us-dollars-usd-online/
购买道具货币,https://procurrencyland.com/
购买假欧元,https://procurrencyland.com/buy-fake-euros-online/
购买假澳元,https://procurrencyland.com/buy-fake-australian-dollars-aud/
购买假币,https://procurrencyland.com/
购买假币,https://procurrencyland.com/
购买假美元https://procurrencyland.com/buy-fake-us-dollars-usd-online/
购买假英镑纸币https://procurrencyland.com/buy-fake-british-pound-gbp/
购买假美元纸币,https://procurrencyland.com/
购买假加拿大元 (CAD) https://procurrencyland.com/buy-fake-canadian-dollars-cad-online/
购买100%未检测的假币,https://procurrencyland.com/
购买克隆卡,https://procurrencyland.com/?s=cloned+cards
购买假人民币,https://procurrencyland.com/buy-fake-chinese-yuan-cny-renminbi/
购买假欧元,https://procurrencyland.com/buy-fake-euros-online/
在安大略省购买假加拿大元,https://procurrencyland.com/buy-fake-canadian-dollars-cad-online/
在温尼伯购买假加元,https://procurrencyland.com/buy-fake-canadian-dollars-cad-online/
在多伦多购买假加元,https://procurrencyland.com/buy-fake-canadian-dollars-cad-online/
购买 100% 无法识别的假币,https://procurrencyland.com/buy-fake-canadian-dollars-cad-online/
购买假美元纸币,https://procurrencyland.com/
购买假美元/澳元/加元/日元/人民币/英镑/欧元/英镑/美元,https://procurrencyland.com/
购买假加元,https://procurrencyland.com/buy-fake-canadian-dollars-cad-online/
采用特殊印刷技术,纸币正面的多个图案可通过触摸识别。
伪钞识别指南对比了真伪安全特征。
——我们的纸币/纸币可以绕过一切防伪手段,包括假笔和机器。
– 可在银行使用,也可在其他地方像普通货币一样使用
– 我们拥有最好的全息图和复印机
– 紫外线:是
我们的钞票采用红外检测技术,可绕过紫外线机器、
笔试甚至目测,伪钞专家都能轻松识别。
我们的钞票质量达到 AAA+ 级。
我们还销售并提供货币清洁服务和解决方案。
我们提供 AAA+ SSD 黑钱解决方案。
-全息图和全息条
-微缩文字
-金属油墨和线
-水印
-红外检测
-紫外线功能
-透视功能
-不同的序列号
这些功能使我们的钞票 100% 无法检测,100% 安全可靠,可在以下任何场所使用:
银行、赌场、ATM、货币兑换商、商店。它们 100% 无法检测。
!!!!!!!!!!!! 基本联系方式如下!!!!!!!!!!!
电话号码/短信: ….(+16614123859)
WhatsApp 号码: (+16614123859)
网站:https://prodocsandbills.com
网站:https://procurrencyland.com
邮箱:specialdocuments350@gmail.com
Telegram:@Authenticpaper
Snapchat: deepweb90
在线购买驾照(WhatsApp:+16614123859)、身份证、护照和生物识别文件。
购买真正的英国护照(英国)、美国护照和加拿大护照https://prodocsandbills.com/product-category/buy-real-passport-online/